I have used the Nik filters software package to enhance some images since it was a $150 package. It is in fact, the only image processing plugin that I use in addition to my regular workflow software, Capture One Pro 11 and Adobe Photoshop.
The package was acquired by Google in 2012 who made it free but then subsequently abandoned any further development in 2017. The ultimate effect of this was that as Photoshop and Lightroom were updated, incompatibilities started to creep in, leading to software crashes and general instability, much to the concern of regular users.
I had all but given up hope of continuing to use the Nik filters collection suite when suddenly, imaging software company DxO announced they had acquired Nik and had produced a major update. This resulted in full compatibility with Photoshop, Lightroom and Apple OS operating system.
Nik is no longer free, with DxO charging just $69 for this very powerful product – (was on offer for $50 until July 1). Actually great value considering you get a total of seven creative plugins – most of which I use at different times.
Analog Efex Pro
Create a range of effects emulating both creative wet darkroom techniques and/or the look produced by various camera and film combinations. The least used of the plugins in my personal situation.
Color Efex Pro
This is the filter I use most. It includes options for color corrections, retouching, extracting fine detail and contrast corrections. In my opinion this filter, along with Viveza and Sharpener is worth the price alone.
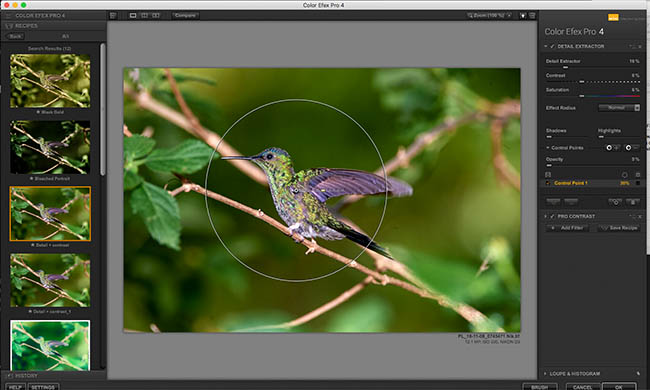
Setting the Control point so that just the hummingbird is selected.
In this image I have added two filter effects to the original image. First I have selected color extractor followed by a Pro-contrast adjustment. As this is a regular combination for me I have also saved this setting as a ‘Recipe’ that I can quickly add to other images. As I still want to ensure the bird stands out from the background I have set a control point for each filter and adjusted the circle to just encompass the bird leaving the background pixels unaffected.
Please note that the image sliders are not working in the latest version of WordPress. We are working on a fix for this.
[smartslider3 slider=2]
[twenty20 img1=”22183″ img2=”22184″ offset=”0.5″]
Use the slider to see before and after using filter
CAUTION – This filter is extremely powerful and it’s very easy to overdue it’s use creating an artificial look to your image. The effect should be subtle!
Silver Efex Pro
Now, the only method I use to convert images to black-and-white. A huge range of controls available including presets emulating the effects of traditional camera filters for mono photography, tonal and contrast corrections, and dynamic range adjustments. In fact just about everything I could previously achieve in a traditional wet process darkroom but with a great deal more control.
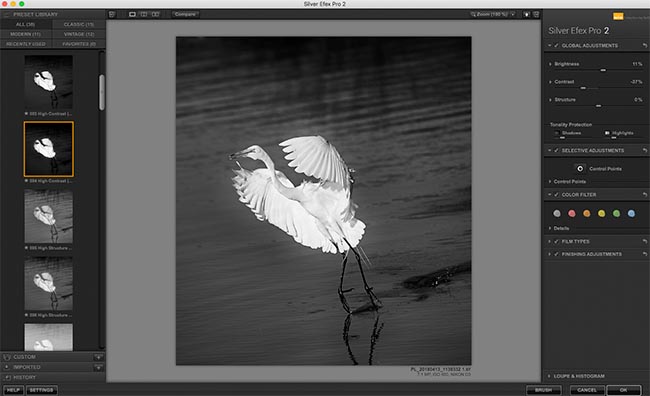
Adjustments using Silver Efex Pro
[twenty20 img1=”22181″ img2=”22172″ offset=”0.5″]
Use the slider to see before and after using filter
For this conversion I first chose the High Contrast preset that added some refinements of my own by increasing the brightness slightly and reducing the contrast.
Viveza
Need to selectively adjust color or tone in just a part of your images? Achieve enhancements exactly where you need them which blend beautifully with the rest of the image without creating complicated masks. Achieved using Upoint technology (see below) which is also available to apply selective adjustments to other filters within the suite.
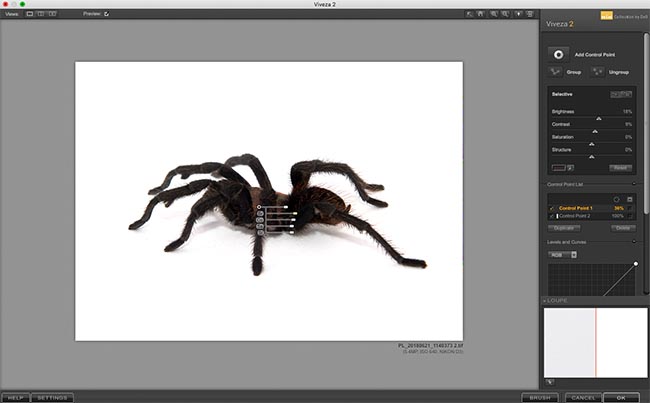
Image being adjusted using Viveza
I used two control points, one to lighten the spider and one to brighten the white background. The whole process took less that one minute without having to mask a single thing.
[twenty20 img1=”22179″ img2=”22170″ offset=”0.5″]
Use the slider to see before and after using filter
HDR Efex Pro
Create a range of HDR (High Dynamic Range) effects, adjusting tonality, opening shadows and enhancing saturation. I usually run through the presets to find the one that most closely resembles the effect I am seeking and then make adjustments to fine tune the image.
[twenty20 img1=”22175″ img2=”22176″ offset=”0.5″]
Use the slider to see before and after using filter
I opened the image in HDR Efex and quickly scanned through the pre-sets before choosing Graduated 1 HDR Efex can also be used to combine several images taken at different exposures into an HDR iage
Sharpener Pro
Whilst Photoshop and Capture One have some fine sharpening tools in my opinion this filter is far superior. First, you have the ability to pre-select sharpening based on the final use of the image – inkjet printer, screen, continuous tone printer etc. Further, you can easily apply selective sharpening to different parts of the image.
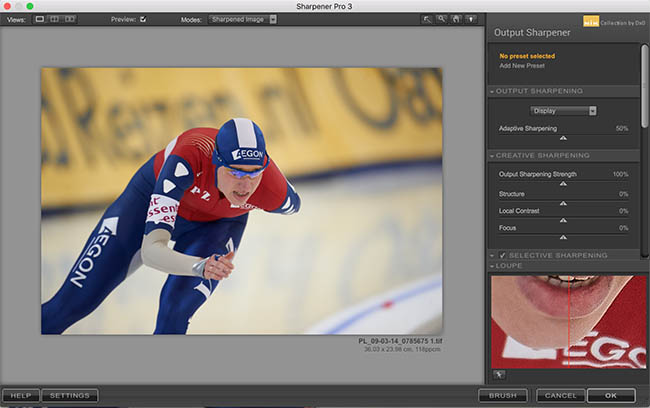
The sharpener dialogue box
Dfine
The best noise reduction package I have found. Dfine has built-in profiles, customized to different cameras and ISO settings, which applies the reduction only to noise elements of the file so that details are not lost. Although modern cameras are themselves, extremely good at reducing noise at high ISO settings I find myself often using Dfine on older images shot with older, less adept cameras.
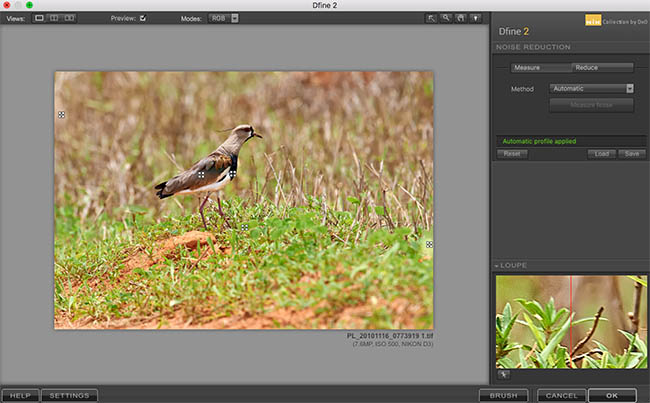
Here Dfine is automatically selecting the right profile for the camera/ISO combination used
The workflow
My usual workflow when using the Nik suite is the following – note that of course not every stage of this flow is used on every image, it depends entirely on the image at hand and the desired final effect.
- Apply noise reduction – never user Dfine after final sharpening of an image as you may soften the sharpening effect you are aiming for
- Control specific areas of the image that need contrast or brightness adjustments using Viveza
- Apply tonal and detail enhancements in Color Efex Pro (Note this is actually the starting point for many of my images)
- Convert to black and white if desired using Silver Efex Pro
- Sharpen the image for the desired output using Sharpener Pro – I only use this step when an image is being prepared for final output and sharpening is applied according to the use of the image. Always size your image before applying sharpening as different degrees of sharpen are required for different output sizes, even of the same image.
On occasions when I want to produce an HDR image I will use HDR Efex Pro immediately after using Dfine (if noise reduction is necessary.)
Upoint Technology
Upoint technology uses selection points to select and modify a specific part of your image. As you click on a specific point the ‘masking effect’ will automatically select similar colours within the selected area (see the sliders on the tarantula image) The first slider controls the size of the circle of influence, with lower sliders creating the desired effects
Using Nik with Capture One 11
Although the Nik collection is designed to integrate with Adobe Photoshop and Lightroom you may know that I have recently moved from Lightroom to Capture One Pro 11 as my primary Raw conversion and databasing program – see https://peterllewellyn.com/new-workflow/
It is in fact extremely easy to ’round trip’ an image from Capture One into the Nik filters and save back to a new version in Capture One. Simple select File/Edit with (or right click the thumbnail and select Edit with) and a pop-up window asks what program you wish to use for your editing. Select the desired Nik filter and afterwards save your image which will automatically be added to the Capture One catalog.
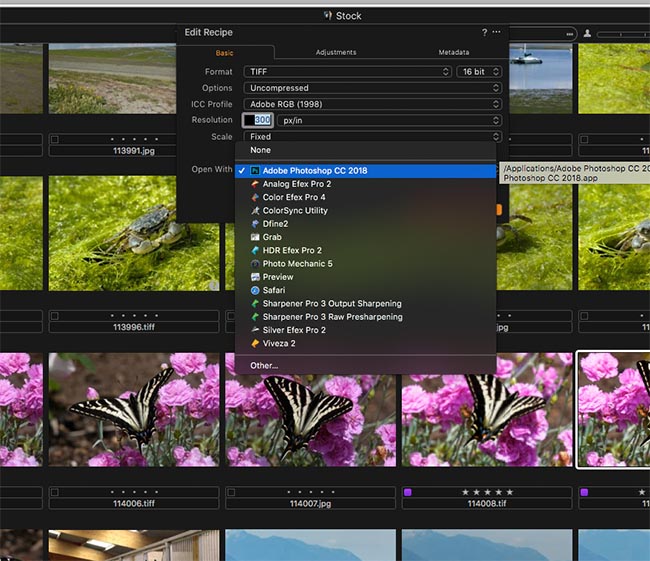
Capture One 11 Edit with dialog box
The downside of this method is that you have to re-open the image and save it multiple times if using more than one filter
If I intend to use more than one of the Nik filters it is much more convenient to open the image in Photoshop then use the multiple filters in sequence before saving a single time.
Download a fully functioning 30 day trial at https://nikcollection.dxo.com and try this amazing product for yourself.
Search the image database by entering keywords below


