Capture One version 20 was released early in December 2019 and is touted as a major upgrade over Capture One 12. Now, you may well ask what happened to versions 13 through 19 and the short answer is they never existed. Version 20 is to bring the vesion number in line with the year, of course it now being 2020.
Whats New
- Greatly improved noise reduction algorithm
- New basic colour editor
- Improved High Dynamic Range Tool
- Improved Crop Tool
- ‘Switch to next’ speeds up image selection
- Select tools to have scrolling turned on and pin your favourites to non-scrolling mode (Very useful when working on smaller screens)
- Copy layers and masks between images
I have been using Capture One 20 since it’s release date (In fact before that as I was part of the Beta program). Below are the new and improved aspects.
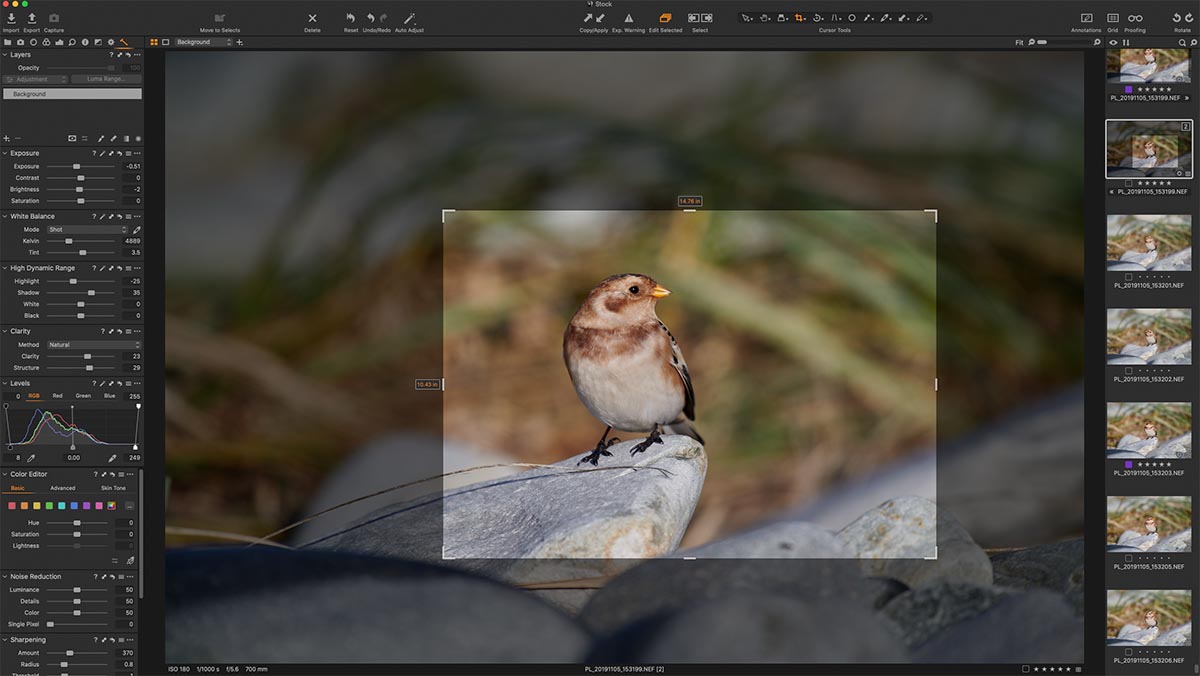
Noise Reduction
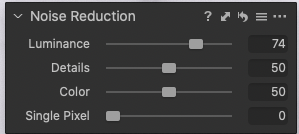 The new noise reduction algorithm is a huge improvement over version 12. Much smoother reduction, less artifacts, improved colour accuracy and improved recognition of patterns and edges all contribute to a better image. The amount slider has a much stronger effect than previously and overall noise reduction is increased for higher ISO images. This improvement is so good that I have stopped using NIK Dfine completely, which previously was my go-to tool.
New Basic Colour Editor

Basic color editor
To term this new tool ‘basic’ is to greatly undersell its potential. It is simplicity itself to grade a particular colour. Select the tool, move the cursor to the colour on the image you wish to work with, click and hold and simply move the cursor left and right or up and down. Horizontal movements control hue (add the ALT key] to control lightness), vertical movements control saturation.
Alternatively you can also use the dropper tool to select a colour and adjust with the sliders. All the old clour balance tools are still intact should you wish to use them instead.
High Dynamic Range
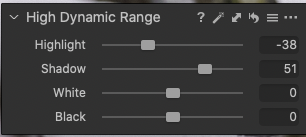
High dynamic range tool
High dynamic range adjustments should not be confused with the creation of HDR imges, i.e. the blending of several image with different exposures to create one new HDR (and often garish!) image.
For my purposes, and the purposes of Capture One, HDR adjustments are designed to extract the full dynamic range possible from a raw capture. In previous versions the HDR tool was used to recover shadows and/or highlights. With version 20 the tool has been reworked to allow both recovery, or, to increase the shadows and highlights and now to also adjust the blacks and whites.
What this means is that, for example, in the highlights slider, move left to recover detail and right to increase highlight brightness.Shadows works the converse way. In effect you can now, for the first time brighten highlights and recover shadows.
This tool now sports two additional controls, White and Black. These sliders affect only the blacks and whites in the image, in a similar way to setting the black point and white point in Lightroom.
This tool now gives ultimate control over the full dynamic range of the image whilst retaining a completely natural look.
Crop Tool
I could never understand why, when using previous versions of Capture One, I had to select another tool after making a crop for the crop to actually be applied to the image. Then, if I needed to tweak the crop, I had to go back and reselect the crop tool again. This was one of my biggest frustrations of the program. Finally this has been addressed in version 20, Make a crop and hit enter – hooray – immediately the crop is applied to the image. In addition the corner crop handles have been enlarged to make grabbing them with the cursor much easier.
In addition holding the shift key while making a crop retains the current aspect ratio and ALT will crop from the middle outwards
The crop tool
Scrollable tools
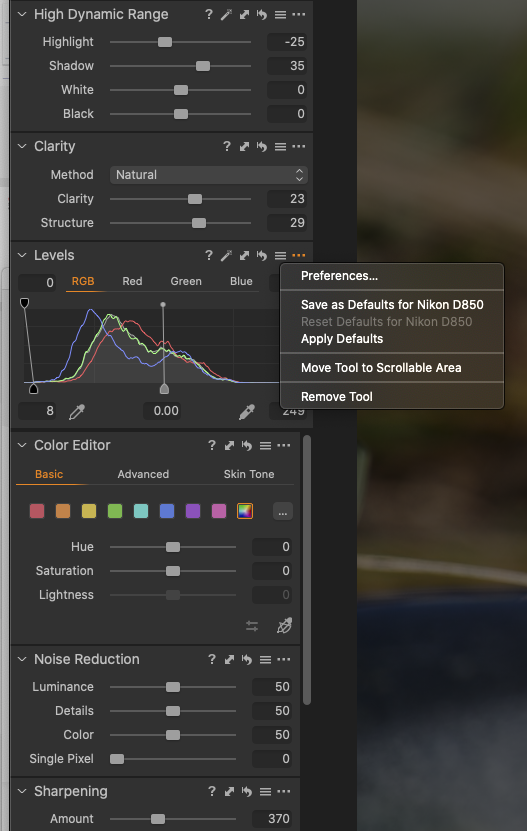
Scrollable tools
In previous versions if all the tools did not fit on your screen space you had to collapse some to make room for others. Now you can select some tools to permanently display i.e. ‘pinned’ and move others that, for example, you use only intermittently, to a new scrollable area. This is particularly valuable if working on a small screen or laptop.
For my main 27″ screen (a BenQ SW2700) on which I do most of my work, I have built a set of custom tools (Capture One has almost infinite ways of customizing just about everything to suit your own workflow) that suit my own particular way of working. Working from the top down I have in the pinned area:
- Layers
- Exposure
- White balance
- High dynamic range
- Clarity
- Levels
Below that in a scrollable area I have
- Color Editor
- Noise reduction
- Sharpening
- Spot removal
- Base Characteristics (this is only there to allow me to upgrade the processing engine from previous versions of Capture One to version 20 if needed for images that were previously imported. of course all new imports will automatically use the Capture One 20 engine)
To move tool to or from the scrollable area click on the three small dots which open the tool preferences fly-out and select move to or remove from the scrollable area
Copy and apply layers
With the powerful layers built in to Capture One I find I am making less and less round trips to Photoshop. Often we find ourselves working on several very similar images and previously you could only copy the whole layer set from one image to another. This has now been improved so that you can select which layers to copy and additionally the layers will self adjust if the images are different dimensions. Copied layers will now add themselves to the new images existing layers instead of replacing them.
Version 20 also has a number of minor tweaks.
Preview quality is somewhat improved, support for DNG files is better (I never use them so can’t comment), and you can use switch to next when viewing previews i.e. add a star rating to an image and you will automatically proceed to the next thumbnail. Personally I leave this turned off.
Conclusion
So, this is a fairly big release. For my particular image workflow the improved dynamic range tool and noise reduction algorithm, particularly on high ISo images, along with the easier cropping would be worth the price of the upgrade.
Likes
- Improved crop tool
- High dynamic range tools beats every other program I have tried
- Better Noise reduction tool now means I don’t have to round trip to another software
- New basic color editor makes colour grading easy.
Dislikes
- Cataloging still needs improvement. Search function is still slow, especially if you have a large catalog which, of course I do.
- Importing is still a bit too slow and often the previews take an inordinately long time to generate which is frustrating if you import a large shoot are in a hurry to start work on the images.
- Price of upgrade from previous versions a little on the high side
A new license Capture One Pro 20 costs $299, with an upgrade $159. Sony and Fujifilm versions can be licensed for $129.
A monthly, subscription is $15 a month. The Sony and Fujifilm subscriptions are $8 per month.
If you want to give it a try there is a 30-day fully-featured free trial